- Home
- »
- How To
- »
- Documentation
- »
- SOPs
Standard Operating Procedures
PRESERVATION INFORMATION
ACCOUNT MANAGEMENT
SOP-01 FITBIR ACCOUNT REQUEST / DATA ACCESS PERMISSION REQUEST
SOP-01 FITBIR ACCOUNT REQUEST / DATA ACCESS PERMISSION REQUEST
Reviewed: January 19, 2016
FITBIR is a restricted access portal to search data relevant to traumatic brain injury (TBI) research. A FITBIR account is required to submit or access TBI-related data. Investigators and data managers at research sites are invited to request an account. To provide maximum protection for the confidentiality of research participants whose data is stored in FITBIR, professional credentials are verified by the FITBIR Data Access & Quality Committee (DAC) during the account request process.
Prerequisites:
1. Signed PDF of the Data Access Request (DAR) form.
Procedure:
This procedure provides process steps for account request initiation, authorization, and validation. The entire procedure typically requires 1-3 business days (assuming Prerequisites are already met).
Data Access Permission Request Initiation
- Point your browser to the FITBIR website at http://fitbir.nih.gov.
- Click the "Log Into FITBIR" button and login using your username and password. Then click the "Request a New Account" link.
- On the Account Management page, under Administrative File Templates, click and download the Data Access Request template.
- Once completed and signed, upload the DAR under "Upload Supporting Documentation."
- Click on "Data Access Request" under the "File Type" drop down menu
- Click on the [Browse] button to search for your document
- Upload your document
- Click the [Continue] button once the DAR has been uploaded.
- On the next Account Management page, fill in the required fields denoted with an *.
- Note: When describing interest in FITBIR, keep in mind that this information is pertinent to having administrators approve the account.
- Click the [Continue] button when required fields are complete.
- On the Request an Account: Account Privileges" page, check the boxes corresponding to the Data Repository, Query, and Meta Study privileges.
- Click Submit Request.
- If all required fields were successfully entered, a confirmation page will be displayed.
Data Access Permission Request Review and Authorization
- The FITBIR Operations staff will review the Data Access Request form for accuracy and completeness.
- The FITBIR Operations team may contact applicant for more information if there are any errors in the form.
- FITBIR Operations staff provides this form to the FITBIR DAC.
- The FITBIR DAC reviews the information and authorizes data access.
- With authorization from the FITBIR DAC, FITBIR Admin establishes a user account, with the privileges corresponding to data access.
- FITBIR Admin sends you an automated email message notifying you of your account activation, or of a change in your account privileges.
Account Validation
- Watch your email inbox for a message from "noreply@fitbir.nih.gov" with subject "Your FITBIR website account has been approved." If you do not receive an email in a timely manner, please check your spam filter and/ or reach out to FITBIR Ops.
- Return to the FITBIR website to login.
- You may now access the data in FITBIR.
DAR FAQs:
1.Q: What fields are required?
A: All pertinent information under Recipient Information and Certifications is required.
2.Q: If I am the PI of a study who is completing the Data Access Request form, what do I fill out?
A: If you are the PI of a study requesting data access, please complete all relevant Recipient Information and Certifications information. You do not need to complete the Project Director/Principal Investigator Contact Information section.
*Please be sure to include the Recipient's Authorized Institutional Business Official information
3.Q: If I am not the PI, but am another member of a research team who is completing the Data Access Request form, what do I fill out?
A: If you are another member of a research team requesting data access, please complete all relevant Recipient Information and Certifications information.
*Please be sure to include your Project Director/Principal Investigator Contact Information, and the Recipient's Authorized Institutional Business Official information
4.Q: Who should complete the Recipient's Authorized Institutional Business Official Information?
A: The person who signs off on this section of the form needs to be responsible for assuring compliance with all the conditions associated with accessing the FITBIR data. Below is a link below of the data sharing policy measures that should be adhered to. The person that is authorized to sign off as the business officer for this data access request can vary from site to site. Although we recommend consulting leadership within your organization, we usually see department heads or those individuals that would sign off on clinical trial agreements (CTAs) for multisite trial participation.
Link to Data Sharing Policies: FITBIR_Data_Sharing_Policy.pdf
5.Q: How do I know which modules to request in FITBIR?
A: You should request modules based on your need in the system. The privileges and their details are listed below:
Data Submission:
GUID- generates global unique identifiers for study participants
Data Dictionary- users can create data elements and form structures for their studies
Data Repository- houses information regarding which information pertaining to studies, the PIs, and correlating data is in FITBIR
Data Access:
Query- users can access and download data stored in FITBIR
Data Repository- mentioned above
Meta Study- allows researchers to upload documentation and data that could be used
SOP-02 FITBIR ACCOUNT REQUEST / DATA SUBMISSION PRIVILEGE REQUEST
SOP-02 FITBIR ACCOUNT REQUEST / DATA SUBMISSION PRIVILEGE REQUEST
Reviewed: January 20, 2016
FITBIR is a restricted access portal to research data relevant to traumatic brain injury (TBI) research. A FITBIR account is required to submit or access TBI-related data. Investigators and data managers at research sites are invited to request an account (refer to SOP-01). To provide maximum protection for the confidentiality of research participants whose data is stored in FITBIR, professional credentials are verified by the FITBIR Data Access & Quality Committee (DAC) during the account request process.
To submit data to FITBIR, an investigator is required to complete a FITBIR Data Submission Request. With an approved submission request, an investigator can submit descriptive data, experimental data, and a variety of supporting documentation associated with a research study to a FITBIR Study — a virtual container for storing research data. To create a FITBIR Study, an investigator must have a current Data Submission Request form uploaded to FITBIR.
The person responsible for collecting the data is typically the Principal Investigator (PI). Alternatively, it could be a Co-Investigator who is responsible for data coordination for the study. The person who signs the Data Submission Request form will create the FITBIR Study.
Prerequisites:
- Valid FITBIR account with STUDY privilege (see SOP 03 FITBIR Request Additional Account Privileges, if needed)
- Signed, PDF of the Data Submission Request
Procedure:
This procedure provides process steps for study submission initiation, authorization, and validation. The entire procedure typically requires 1-3 business days (assuming Prerequisites are already met).
Study Submission Privilege Request Initiation
- Point browser to the FITBIR website at http://fitbir.nih.gov.
- Click the LOG INTO FITBIR button, and login using your username and password. Then click the “Request a New Account” link.
- On the Accounts Management page, under Administrative File Templates, click and download the Data Submission Request (DSR) template.
- Once completed and signed, upload the DSR under “Upload Supporting Documentation.”
- Click on “Data Submission Request” under the “File Type” drop down menu
- Click on the [Browse] button to search for your document
- Upload your document
- Click the [Continue] button once the DSR has been uploaded.
- On the next Accounts Management page, fill in the required fields denoted with an *.
- Note: When describing interest in FITBIR, keep in mind that this information is pertinent to having administrators approve the account.
- Click the [Continue] button when required fields are complete.
- On the “Request an Account: Account Privileges” page, check the boxes corresponding to the GUID, Data Dictionary, Data Repository, and ProForms.
Study Submission Privilege Request Review and Authorization
- The FITBIR Operations staff will review the Data Submission Request form for accuracy and completeness.
- FITBIR Staff may contact applicant for more information if there are any errors in the form.
- The FITBIR Operations staff provides this to the FITBIR Data Access Committee (DAC).
- The FITBIR DAQ reviews the information and authorizes data submission in FITBIR.
- With authorization from the FITBIR DAC FITBIR Admin establishes a user account, with the privileges corresponding to data submission.
- FITBIR Admin sends an automated email message notifying you of your account activation, or of a change in your account privileges.
Study Validation
- Watch your email inbox for a message from "noreply@fitbir.nih.gov" with subject "Your FITBIR website account has been approved. If you do not receive an email in a timely manner, please check your spam filter and/ or reach out to FITBIR Ops.
- Return to the FITBIR website to login.
- You may now create a study and submit data to FITBIR.
DSR FAQs:
1.Q: What fields are required?
A: All pertinent fields are required on this form.
2.Q: What sections of the form should I sign?
A- If you are not the PI, both yours and the PI signatures are required. If you are the PI, please sign and date both the PI Signature and Signature sections.
3.Q: How do I know which modules to request in FITBIR?
A: You should request modules based on your need in the system. The privileges and their details are listed below:
Data Submission:
GUID- generates global unique identifiers for study participants
Data Dictionary- users can create data elements and form structures for their studies
Data Repository- houses information regarding which information pertaining to studies, the PIs, and correlating data is in FITBIR
Data Access:
Query- users can access and download data stored in FITBIR
Data Repository- mentioned above
Meta Study- allows researchers to upload documentation and data that could be used
4.Q: What is a certificate of confidentiality, and is it required?
A: The release of identifiable information may be protected from compelled disclosure by the primary investigator’s institution if a Certificate of Confidentiality is or was obtained for the original study. The NIH and the DOD explicitly encourage investigators to consider the potential appropriateness of obtaining a Certificate of Confidentiality (http://grants.nih.gov/grants/policy/coc/) as an added measure of protection against future compelled disclosure of identities for studies planning to collect genome- wide association data.
It is not a requirement to have a Certificate of Confidentiality (CoC) to use our system, but we want to document if sites have them for our records.
SOP-03 FITBIR REQUEST ADDITIONAL ACCOUNT PRIVILEGES
SOP-03 FITBIR REQUEST ADDITIONAL ACCOUNT PRIVILEGES
Reviewed: January 20, 2016
FITBIR is a restricted access portal that allows a search of data relevant to traumatic brain injury (TBI) research. A FITBIR account is required to submit or access TBI-related data. Investigators and data managers at research sites are invited to request an account. To provide maximum protection for the confidentiality of research participants whose data is stored in FITBIR, professional credentials are verified by the FITBIR Data Access Committee (DAC) during the account request process.
Prerequisites:
Valid FITBIR account (see SOP-01 and SOP-02).
Procedure:
This procedure provides process steps for privilege request initiation, authorization, and validation. The entire procedure typically requires 1-3 business day (assuming Prerequisites are already met)
Additional Account Requests
- Point your browser to the FITBIR website at http://fitbir.nih.gov
- Click on the “LOG INTO FITBIR” button, and login using your username and password.
- Click on the Account Management icon in Workspace or the Account Management tab in the top navigation.
- Select the Request Additional Privileges from the left navigation.
- Scroll down to see all existing, and additional privileges.
- Click next to desired privilege(s). A check will appear when selected.
- Click on the Request Privileges button at bottom of page when finished.
- A Privilege Request Confirmation page will appear when data is successfully entered.
Account Request Review and Authorization
- FITBIR Staff review the information provided in privilege request.
- FITBIR Staff may contact applicant for more information about intended use of the privilege.
- The FITBIR Admin sends an automated email message to user when additional privileges have been granted.
Account Validation
- Watch email inbox for a message from "noreply@fitbir.nih.gov" with subject "FITBIR Website profile update status."
- Review the message. If approved, the privilege is applied upon the next login to FITBIR. If denied, review the message and contact the FITBIR Member Center with any questions.
- Return to the FITBIR website to login.
SOP-04 FITBIR FORGOT PASSWORD
SOP-04 FITBIR FORGOT PASSWORD
Reviewed: January 20, 2016
FITBIR is a restricted access portal to research data relevant to traumatic brain injury (TBI) research. A FITBIR account is required to submit or access TBI-related data. Investigators and data managers at research sites are invited to request an account. To provide maximum protection for the confidentiality of research participants whose data is stored in FITBIR, professional credentials are verified by the FITBIR Data Access Committee (DAC) during the account request process.
Prerequisites:
A valid, active FITBIR account (see SOP-01 & SOP-02).
Procedure:
This procedure provides process steps for retrieving a forgotten password. The entire procedure typically requires 5-10 minutes (assuming Prerequisites are already met).
Forgot FITBIR Password
- Point browser to the FITBIR website at http://fitbir.nih.gov.
- Click on the “LOG INTO FITBIR” button.
- Click the ‘Forgot Your Password?’ link.
- Provide FITBIR user name or email address that was used when a FITBIR account was created. Notes:
- • The username or email address entered is not case sensitive.
- ·If the user enters an invalid username or email address, an error message will be displayed next to the username/email field.
- Click the [Reset Password] button.
- If a valid email address or username has been entered, a confirmation page will be displayed.
Password Validation
- Watch email inbox for a message from "noreply@fitbir.nih.gov" with the subject "FITBIR Website Forgot Password Recovery." If you do not receive an email in a timely manner, please check your spam filter and/ or reach out to FITBIR Ops.
- Click on the link inside the email and enter the required information.
- Click the [Change Password] button.
- Note: The password must have not been used in the last 25 passwords.
- Once redirected to the FITBIR homepage, log in as usual.
SOP-05 FITBIR FORGOT USER NAME
SOP-05 FITBIR FORGOT USER NAME
Reviewed: January 20, 2016
FITBIR is a restricted access portal that enables a search for data relevant to traumatic brain injury (TBI) research. A FITBIR account is required to submit or access TBI-related data. Investigators and data managers at research sites are invited to request an account. To provide maximum protection for the confidentiality of research participants whose data is stored in FITBIR, professional credentials are verified by the FITBIR Data Access Committee (DAC) during the account request process.
Prerequisites:
Having a valid, active FITBIR account (See SOP-01 & SOP-02).
Procedure:
This procedure provides process steps for retrieving a forgotten username. The entire procedure typically requires 5-10 minutes (assuming Prerequisites are already met).
Forgot FITBIR User Name
- Point your browser to the FITBIR website at http://fitbir.nih.gov
- Click on the “LOG INTO FITBIR” button.
- After page redirects, click ‘Forgot your username?’
- The Username Recovery page will prompt the user for the email associated with your account.
- Then click [Recover Username].
- If successful, a confirmation page will appear.
User Name Validation
- Watch email inbox for a message from "noreply@fitbir.nih.gov” with subject "Your FITBIR account: Forgotten Username". If you do not receive an email in a timely manner, please check your spam filter and/ or reach out to FITBIR Ops.
- Return to the FITBIR website to login.
DEFINING DATA
SOP-06 FITBIR DATA ELEMENT (DE) CREATION & PUBLICATION
SOP- 06 FITBIR DATA ELEMENT (DE) CREATION & PUBLICATION
Reviewed: January 21, 2016
The FITBIR Data Dictionary incorporates and extends the Common Data Element (CDE) definitions developed by the NINDS (National Institute of Neurological Disorders and Stroke) CDE Workgroup. The Data Dictionary also allows investigators to define the data they submit as well as provide alternate terms (aliasing) and translation rules for the same element. Occasionally, research data may not align perfectly to the Common Data Elements. In this case, researchers may extend the Data Dictionary and create unique data elements (UDEs).
A data element is a logical unit of data, pertaining to information of one kind. A data element has a name, precise definition, and clear enumerated values (codes) if applicable. A data element is not necessarily the smallest unit of data; it can be a unique combination of one or more smaller units. A data element occupies the space provided by field(s) on a paper/electronic case report form (CRF) or field(s) in a database record.
Prerequisites:
- Valid FITBIR account with Data Dictionary privilege (see SOP-02)
- FITBIR Data Dictionary has been searched and NO CDE or UDE describes/matches the desired data element
Procedure:
This procedure provides process steps for creating a data element request initiation, authorization, and validation. The entire procedure typically requires 1-3 business days (assuming Prerequisites are already met).
Data Element Request Initiation
- Point your browser to the FITBIR website at http://fitbir.nih.gov.
- Click the “LOG INTO FITBIR” button.
- There are two ways to find the Data Dictionary Tool:
- Through Workspace -> Click Data Dictionary Tool
- Through clicking the Data Dictionary tab in the top blue navigation
- When you access the Data Dictionary tool, you will automatically be taken to the Search Form Structures page
- Click the hamburger menu next to Search Form Structures
- There are two ways to create data elements:
- Individually: if you only need to create one DE, click [Create Data Elements]
- Step 1. Edit Details: Fill in all required fields marked with an asterisk
- Note: For additional information about category groups and classification, redirect to DataElements OR http://www.commondataelements.ninds.nih.gov/#page=Default
- Click Continue when complete.
- Step 2. Define the Data: Fill in all required fields with an asterisk *
- Click Continue when complete
- Step 3. Associate Keywords. Note: There are no required fields; however, it is beneficial to associate keywords with a data element.
- Click Save & Finish when complete.
- A confirmation message will appear alerting you that the data element is in a draft state
Data Element Publication Request Initiation
- When you are ready to request publication, open the Data Dictionary tool.
- Select the Search Data Elements option from the left hand hamburger menu.
- Search for the desired data element and click on it once found.
- Under Publication State, click the Request Publication link. The status is now changed to Awaiting Publication.
- A message will appear under the Publication State heading along with the option to Cancel Publication.
Data Element Request Review and Authorization
- FITBIR Staff review the information provided in the data element publication request.
- FITBIR Staff verify that the data element does not already exist in FITBIR as a CDE or as another data element.
- FITBIR Staff reviews the information and authorizes or denies the publication request.
- The FITBIR Admin sends you an automated email message notifying you of the decision.
Data Element Publication Validation
- Watch your email inbox for a message from "noreply@fitbir.nih.gov" with subject "Request to publish data element has been approved/denied by an admin.”
- If the data element is approved for publication, the next time you log into FITBIR, it should be available for use in Form Structures.
SOP-07 FITBIR FORM STRUCTURE (FS) CREATION & PUBLICATION
SOP- 07 FITBIR FORM STRUCTURE (FS) CREATION & PUBLICATION
Reviewed: January 21, 2016
Form structures are the containers for data elements and common data elements. Form structures are associated in studies for submitting research data or later used to create electronic Case Report Forms (eCRFs).
Form structures adhere to a strict publication process prior to researchers submitting data to that particular form structure. Form structures are initially created in a draft state - they can be modified and data elements may be removed or attached to the form structure. However, research and submission data cannot be submitted to draft form structures.
Once a study is ready to submit data to a form structure, the researcher must request publication for the form structure. After a form structure has been approved by a FITBIR administrator, the form structure becomes published and research data may now be uploaded.
Prerequisites:
· Valid FITBIR account with Dictionary privilege (See SOP-02).
· FITBIR Data Dictionary has been searched to see if a form structure already exists in the system and NONE were found.
Procedure:
This procedure provides process steps for creating a form structure request initiation, authorization, and validation.
Form Structure Request Initiation
- Point your browser to the FITBIR website at http://fitbir.nih.gov.
- Click the “LOG INTO FITBIR” button and log in with your username and password.
- There are two ways to find the Data Dictionary tool:
- Through Workspace -> Data Dictionary Tool -OR-
- Through the Data Dictionary tab in the top blue navigation.
- Launch the Data Dictionary Tool
- On the Search Form Structures webpage, click the hamburger menu on the left, and click on Create Form Structure
- Step 1. Provide General Details
- Note: Fill in all required fields marked with an asterisk *
- Click Continue when complete.
- Step 2. Add Data Elements by clicking on the corresponding button, and searching for desired Data Elements. Click on the checkbox next to each data element to select, and add them to the form structure.
- Add a Group and/or add repeatable Groups by clicking the Add Group button.
- Click Continue when complete.
- Step 3. Grant Permissions as necessary to other team users that will be involved with your Form Structure. Grant permission descriptions are one the webpage, and are as follows: Read, Write, Admin, and Owner.
- Note: Users that have been provided with a permission can be removed in the future.
- Click Continue when complete.
- You will now be able to review your Form Structure to ensure accuracy.
- Click Finish when complete.
- Your Form Structure will be created, and will be in the Draft state.
- Note: The FITBIR system is set to time out after 30 minutes, so it is recommended that you save your work if you anticipate that creating your Form Structure will take longer. You can do this by going to the “Review” chevron, and clicking the Finish button. You can then click the “Edit” button on your created Form Structure to return and make additions.
Form Structure Publication Request Initiation
- In the Data Dictionary tool, select Browse Form Structures.
- Search for desired form structure and click on it once found.
- Under Publication State, click the Request Publication link. The status is changed to Awaiting Publication.
Form Structure Request Review and Authorization
- The FITBIR Operations team review the information provided in form structure publication request.
- The FITBIR Operations team verify that the form structure does not already exist in FITBIR.
- The FITBIR Operations team reviews the information and authorizes or denies the publication request.
- The FITBIR Admin sends you an automated email message notifying you of the decision.
Form Structure Publication Validation
- Watch your email inbox for a message from FITBIR-help@nih.gov with the subject “Request to publish form structure has been approved by an admin.”
- If Form Structure is approved for publication, the next time you log into FITBIR, it should be available for use in Form Structures.
SOP-08 DATA FORMAT FOR VALIDATION TOOL
SOP- 08 DATA FORMAT FOR VALIDATION TOOL
Reviewed: January 21, 2016
The FITBIR informatics system supplies a Validation Tool to assist researchers with the submission of data into the FITBIR repository. The FITBIR Data Validation Tool verifies that submitted data conforms to the required format and range values defined in the FITBIR Data Dictionary. The Validation Tool imports the FITBIR Data Dictionary, and validates the metadata associated with the files identified by the FITBIR user for submission against the data dictionary. The tool provides a report of any data errors and warnings. If errors are found, a submission package cannot be created. The tool, which runs as a Java Web Start application, runs locally on a user's computer, requiring the most update version of Java runtime environment to be installed.
Prerequisites:
- Valid FITBIR account with Dictionary privileges (See SOP-02).
- Completed Form Structure in FITBIR
- Java Runtime installed on your computer (version 7 or higher)
Procedure:
This procedure provides process steps for preparing your data prior to utilizing the Validation Tool. Note: Time will vary depending on the number of data elements in your form structure.
Validation Tool
- Point your browser to the FITBIR website at http://fitbir.nih.gov
- Click the “LOG INTO FITBIR” button and log in with your username and password.
- There are two ways to export form structures from FITBIR
- Through Workspace→Data Dictionary Tool→Browse Form Structures -OR-
- Through the Data Dictionary tab in the top blue navigation→Browse Form Structures.
- Select the desired form structure you want to submit data to.
- In the gray box on the right side of the page, export form structure by clicking on “CSV.”
- Note: Form Structures can only be submitted as CSV files.
- Note: CSV files do not support multiple worksheets/tabs.
- The file download pop up window will appear.
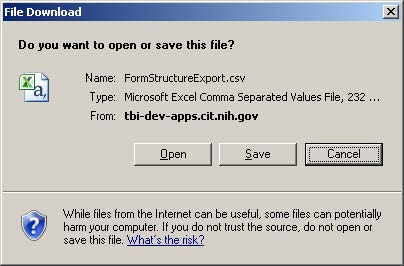
- Click the Save button, or click the arrow to find the “Save As” option. Click this to save your file in the folder of a choice.
- Name the file and save it in a folder separate from other files.
- Note: Most browsers are automatically set to save files in the Download folder. You may need to choose a new folder before you save the file, or copy and paste your file into a new folder after it has downloaded to the Download folder.
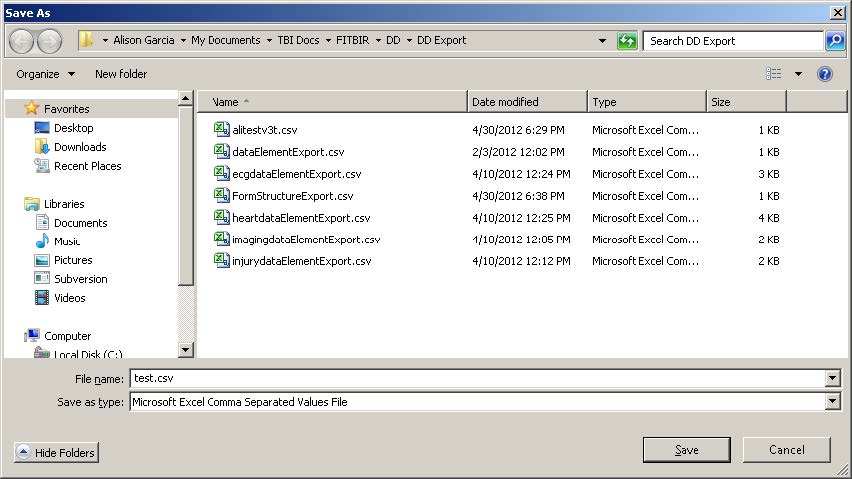
- Note: Most browsers are automatically set to save files in the Download folder. You may need to choose a new folder before you save the file, or copy and paste your file into a new folder after it has downloaded to the Download folder.
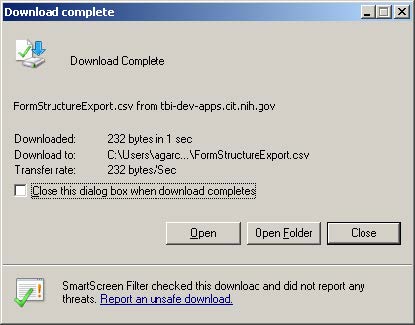
- When successful, the View Downloads window appears. Click the Open button.
- Excel will open. Data can now be submitted to the form structure.
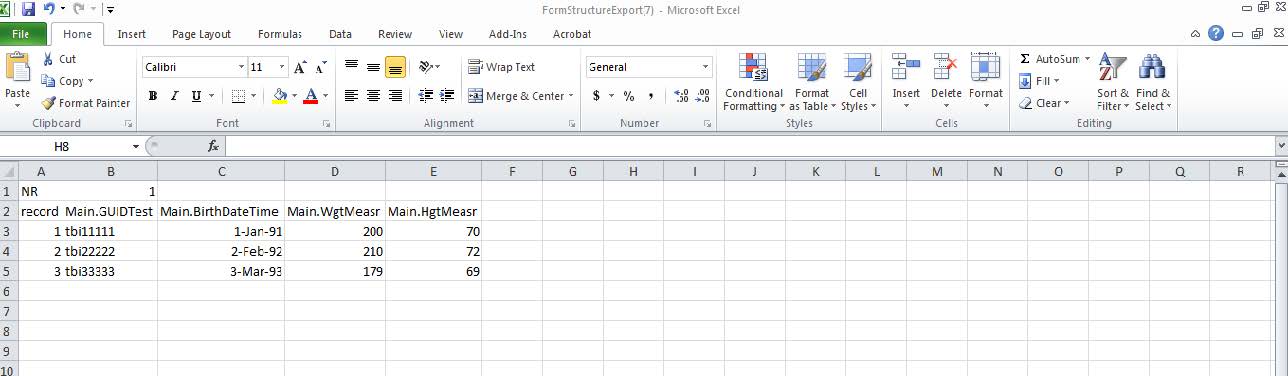
- Helpful Information:
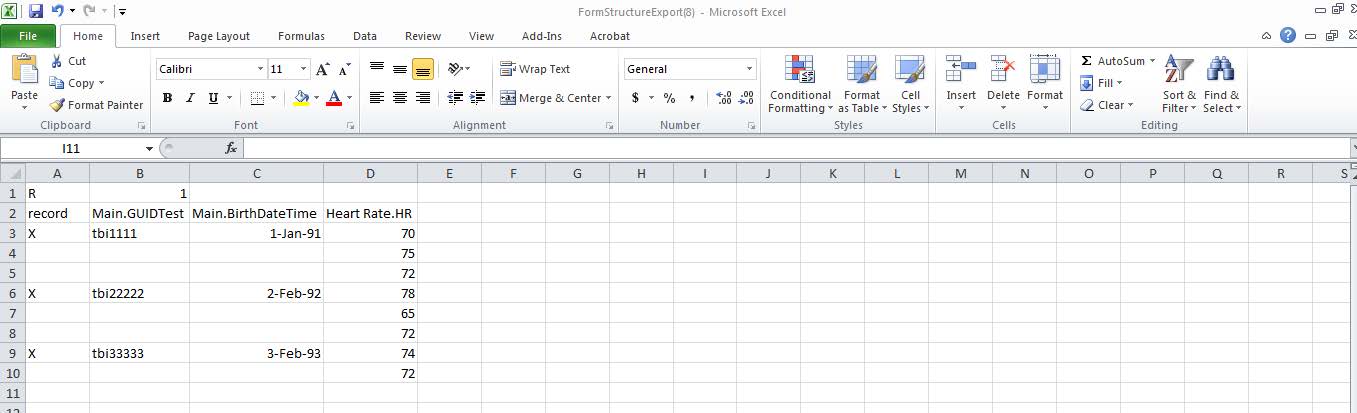
- Column A, Row 1 will always display the form structure name.
- Row 2 will display the names of all the data elements in the form structure (each data element will be in an individual column).
- Format: Main.DataElementName
- I.e. Main.AgeYrs
- Note: “Record” (Column A, Row 2) is always part of the CSV files and will be used to provide a placeholder for unique data entries. This should be a numeric entry, such as “1,2,3.”
- Form Structure with Repeatable Groups:
- Repeatable groups have a different format/naming convention than data elements. Each repeatable group must have a unique name. Format: RepeatableGroupName.DataElementName (i.e. Heart Rate.HR)
- Data elements will first be entered in Column B Row 3 when there are repeatable groups.
- An X must be placed in Column A (record) next to each unique GUID entry in the spreadsheet.
- · In the example below, the repeatable group name is Heart Rate. There are (3) GUIDs in this spreadsheet and there is an X in Column A under “record” at the first record of the GUID in the spreadsheet and at the subsequent locations where a new GUID is entered.
- Once spreadsheet is properly formatted and populated with data, follow the steps Validation Tool SOP to submit data for validation.
CONTRIBUTING DATA
SOP-09 FITBIR VALIDATION TOOL
SOP- 09 FITBIR VALIDATION TOOL
Reviewed: January 22, 2016
The FITBIR informatics system supplies a Validation Tool to assist researchers with the submission of data into the FITBIR repository. The FITBIR Data Validation Tool verifies that submitted data conforms to the required format and range values defined in the FITBIR Data Dictionary. The Validation Tool imports the FITBIR Data Dictionary and validates the metadata associated with the files identified by the FITBIR user for submission against the data dictionary. The tool provides a report of any data errors and warnings. If errors are found, a submission package cannot be created. The tool, which runs as a Java Web Start application, runs locally on a user's computer, requiring the most up to date version of Java runtime environment to be installed.
Prerequisites:
- Valid FITBIR account with Data Submission access (See SOP-02).
- Java Runtime Environment (JRE) installed on your computer (Version 7 or higher)
http://docs.oracle.com/javase/7/docs/webnotes/install/index.html#windows
· Data formatted for submission into FITBIR (saved as a comma separated value CSV file).
Validation Tool
Procedure: This procedure provides process steps for using the Validation Tool.
Note: Time will vary depending on the size of files running through Validation Tool.
Precursor steps prior to using the Validation Tool:
- In FITBIR, create a form structure and add data elements (See the Data Element Creation and Form Structure Creation SOPs).
- Once a form structure is created, select the Export Form Structure found at the bottom of the View Form Structure page
- Click they “CSV” hyperlink and save the file to your working directory.
- Populate the columns of the CSV with data from your study. (Note: Each column in the spreadsheet corresponds to a data element in the form structure)
Note: Draft Form Structures can be run through the Validation Tool, but cannot be created into a submission package and submitted to FITBIR.
Note: For ease of use, place only those files needed for validation in a separate folder prior to using the Validation Tool.
Validation Tool
- Point your browser to the FITBIR website at http://fitbir.nih.gov
- Click the “LOG INTO FITBIR” button and login using your username and password.
- There are two ways to find the Validation tool:
- Through Workspace→Data Repository→Submission Tools
- Through Data Repository tab in top navigation→Submission Tools.
- Launch the Submission Tools
- Open or save the Java™ Web Start Launcher.
- Open the Java Tool. The application will download.
- Run the downloaded application.
- Click “Accept” when the EULA Agreement window opens.
- To validate data:
- When the Submission Tools window opens, it will automatically open to the Validation Tool tab
- Click the “Browse” button, and navigate to the location on your computer of the working directory where files for submission are located
- Click the “Load Files” button
- All files from the directory will be displayed in the “Files” section. You can only include Files that are TYPE “Form Structure”
- Select individual file(s) (click to highlight) that are of TYPE “Unknown” and those files not needed for the submission. Then click “Exclude Files.”
- Note: If you erroneously exclude a file, you can highlight it and click “Include Files.”
- Validate the included files by clicking “Validate Files.”
- Note: If there are any errors or warnings associated with the file, it is displayed in the Result Details table. Files with warnings can be validated. However, files with errors must be fixed prior to being able to validate the file. By clicking “Export Result Details,” a text file is created and stored in the same directory as your working files.
- Click “Build Submission Package”
- Note: The submission package will be deposited in the same working directory as the original files used for Validation Tool
- The data in the submission package can now be submitted to a study using the Upload Tool
SOP-10 FITBIR GUID TOOL FUNCTIONALITY
SOP- 10 FITBIR GUID TOOL FUNCTIONALITY
Reviewed: January 22, 2016
FITBIR is a restricted access portal designed to search for data relevant to traumatic brain injury (TBI) research. A FITBIR account is required to submit or access TBI-related data. Investigators and data managers at research sites are invited to request an account. To provide maximum protection for the confidentiality of research participants whose data is stored in FITBIR, professional credentials are verified by the FITBIR Data Access Committee (DAC) during the account request process.
In FITBIR, research data associated with an individual patient are linked by means of a Global Unique Identifier, GUID. The GUID is a subject ID that allows researchers to share data specific to a study participant without exposing personally identifiable information (PII). GUIDs allow investigators to track participants longitudinally, across multiple research sites and across multiple studies. It is important to remember that PII is never sent to the FITBIR system and that GUID is a random number not generated from PII.
There are (7) functions of the GUID Tool:
- Create GUID
- Convert Pseudo GUID to GUID
- Create Multiple GUIDs (With Error Checking)
- Create Multiple GUIDs (No Error Checking)
- Generate Pseudo GUID
- Generate multiple Pseudo GUIDs (you need special permissions to complete this task)
- Search if GUID(or Pseudo GUID) exists in the system
NOTE: Participant GUIDs are required to submit data to FITBIR.
1. Create GUID
Researchers collect PII from their participants and store that data in a local database that is not made available outside the research institution. Typically, that data is only available to a limited number of individuals. A GUID is made up of random alpha-numeric characters, which are NOT generated from PII. The GUID tool is an application that is downloaded and launched from the FITBIR website and runs locally on a user's computer. This software performs a one-way encryption, often called a one-way hash, which determines if the research subject hash codes have been seen by FITBIR before. A one-way hash is a reproducible method of turning some kind of data into a (relatively) small number that may serve as a digital "fingerprint" of the data. The algorithm "chops and mixes" (i.e., substitutes or transposes) the data to create such fingerprints. The hash represents the “fingerprint”. However, it cannot be used to recreate the original. The encrypted hash codes do not have information to recreate the PII. However, they do have enough information to determine if a research participant GUID already exists in FITBIR.
Prerequisites:
- Valid FITBIR account with GUID privilege (see SOP 03: FITBIR Request Additional Account Privileges if needed)
- Java Runtime Environment (JRE) installed on your computer (Version 7 or higher) http://docs.oracle.com/javase/7/docs/webnotes/install/index.html#windows Information needed to generate a GUID (birth certificates would be helpful, but are not required)
Procedure:
- This procedure provides process steps for using the GUID Tool.
- The entire procedure time varies depending on the number of GUIDs being generated.
- Point your browser to the FITBIR website at http://fitbir.nih.gov
- Click the “LOG INTO FITBIR” button, and login with your username and password.
- There are two ways to find the GUID tool:
- Through Workspace→click on GUID icon
- Through the GUID tab in top navigation→GUID Tool→Create GUIDs
- Launch the GUID Tool
- Open or Save the Java™ Web Start Launcher
- Once it has downloaded, click on the file
- A window asking if you want to run the application will appear- click “Run”
- Click “Accept” when the EULA Agreement window opens
- To generate a single GUID, click “Create GUID”
- Enter in all required fields (1-9) in both columns. Note:
- Do not use abbreviations for city of birth. For example, do not use NYC for New York City or LA for Los Angeles.
- Fields 10-12 are optional. However, if you enter information for #11, you must also fill out #12.
- Once all fields are completed, click the “Generate GUID” button.
- If all fields are successfully entered, you will see a GUID Generation Successful window, with a New GUID #
- Click OK
- A GUID will appear in the lower left corner dialog box. All other fields will be greyed out at this time.
- You can now:
- Copy the GUID directly
- Copy GUID and PII information directly from GUID box or select Copy GUID to Clipboard.
- Clear the fields and begin creating a new GUID
- Exit the GUID Tool
- Note: Only one GUID will be stored in the clipboard at a time. The GUID must be pasted somewhere prior to generating the next GUID or else it will be overwritten.
| PII Field Name | Abbreviation used in the GUIDWS client | Required minimum for Valid GUID | Permissible Values |
|---|---|---|---|
| Complete legal given name of subject at birth | FIRST_NAME | Yes | Alphanumeric |
| Indicator if subject has a middle name at Birth | SUBJECT_HAS_MIDDLE_NAME | Yes | Yes No |
| Complete additional legal name or names at birth | MIDDLE_NAME | Yes | Alphanumeric |
| Complete legal family name/surname of subject at birth | LAST_NAME | Yes | Alphanumeric |
| Day of birth | DOB | Yes | 1-31 |
| Month of birth | MOB | Yes | 1-12 |
| Year of Birth | YOB | Yes | #### |
| City or municipality of birth | CITY_OF_BIRTH | Yes | Alphanumeric |
| Country of birth | COUNTRY_OF_BIRTH | Yes | Alphanumeric |
| Physical sex of subject at birth [M/F] | SEX | No | M F |
| Government Issued or National ID (For the United States, this is the Social Security Number) | GIID | Optional | Alphanumeric |
| Country Issuing Government- Issued or National ID | GIIDCOUNTRY | Optional | Alphanumeric |
Table 1: GUID PII information
2. Convert Pseudo GUID to GUID
This functionality allows users to convert Pseudo-GUIDs to Valid GUIDs. Users need to provide the minimum required PII fields and the Pseudo-GUID information.
Prerequisites:
- Valid FITBIR account with GUID privilege
- Java Runtime Environment (JRE) installed on your computer (Version 7 or higher) http://docs.oracle.com/javase/7/docs/webnotes/install/index.html#windows
- Information needed to generate a GUID (birth certificates would be helpful, but are not required)
- Pseudo GUID ID numbers
Procedure:
This procedure provides process steps for using the GUID Tool. The entire procedure typically takes 1-2 minutes (assuming Prerequisites are already met)
- Point your browser to the FITBIR website at http://fitbir.nih.gov
- Click the “LOG INTO FITBIR” button, and login with your username and password.
- There are two ways to find the GUID tool:
- Through Workspace→click on GUID icon -OR-
- Through the GUID tab in top navigation→GUID Tool→Create GUIDs
- Launch the GUID Tool
- Open or Save the Java™ Web Start Launcher
- Once it has downloaded, click on the file
- A window asking if you want to run the application will appear- click “Run”
- Click “Accept” when the EULA Agreement window opens
- From the Functions dropdown menu, select Convert Pseudo GUID to GUID
- Input Pseudo GUID number into top field for both columns.
- Enter in all required fields (1-9) in both columns. Note:
- Do not use abbreviations for city of birth. For example, do not use NYC for New York City or LA for Los Angeles.
- Fields 10- 12 are optional. However, if you enter in information for #11, you must also fill out #12.
- Once all fields are filled out, click the Convert Pseudo GUID button.
- If successful, a window will pop up entitled “GUID Generation Successful” with a New GUID: ####.
- Click OK.
- 15.A GUID will appear in the lower left corner dialog box. All fields will be greyed out at this time.
- You can now:
- Copy the GUID directly
- Copy GUID and PII information directly from GUID box or select Copy GUID to Clipboard.
- Clear the fields and begin creating a new GUID
- Exit the GUID Tool
3. Create Multiple GUIDs (With Error Checking)
Prerequisites:
- Valid FITBIR account with GUID privilege
- Java Runtime Environment (JRE) installed on your computer (Version 7 or higher) http://docs.oracle.com/javase/7/docs/webnotes/install/index.html#windows
- Comma Separated Values (CSV) file properly formatted with PII
- Information needed to generate a GUID (birth certificates would be helpful, but are not required)
Populating the GUID Batch Template
FITBIR accepts an input file in comma separated format (CSV). The first line of the file should contain the PII field names as defined in Table 1. PII Fields. An additional “ID” field is required for the GUID output to map from the original participant to each generated GUID. The content of this field is left to the user’s discretion for output mapping, but could be a site’s local ID for the participant. If no such ID exists, then a simple ascending integer should be used for each participant. Below is an excerpt from an example GUID batch template.
The proper column headers are: ID, First_Name, Middle_Name, Subject_Has_Middle_Name, Last_Name, MOB [1-12], DOB [1-31], YOB [####], City_Of_Birth, Country_of_Birth, Sex [M/F, at birth], GIID (optional), and GIIDCOUNTRY (optional).
Note: If you are collecting GIID and GIIDCOUNTRY information, you must add these headers to the GUID Batch Template worksheet.
The GUID Batch Template can be downloaded from the FITBIR website
Procedure:
This procedure provides process steps for using the GUID Tool. The entire procedure typically takes 1-2 minutes (assuming Prerequisites are already met)
- Point your browser to the FITBIR website at http://fitbir.nih.gov.
- Click the “LOG INTO FITBIR” button, and login using your username and password.
- There are two ways to find the GUID tool:
- Through Workspace→click on GUID icon
- Through the GUID tab in top navigation→GUID Tool→Create GUIDs
- Launch the GUID Tool
- Open or Save the Java™ Web Start Launcher
- Once it has downloaded, click on the file
- A window asking if you want to run the application will appear- click “Run”
- Click “Accept” when the EULA Agreement window opens
- From the Functions dropdown menu, select Create Multiple GUIDs
- Navigate to location on hard drive where CSV file containing multiple subjects’ PII information. Select file.
- Once file is selected, Click the Generate GUIDs button.
- If successful, generated GUIDs will appear in the table of the pop up window. Errors will also be shown in the lower half of the pop up window.
- Output log files are generated and deposited in the folder where the CSV file for upload is located. The output_guid_####.txt log file contains all the generated GUID numbers. The output_error_###.txt log file contains all the errors associated with the CSV file used for the Create Multiple GUID submission.
- You can now:
- Click Clear/New if you have additional conversions.
- Exit the GUID Tool.
4. Create multiple GUIDs (No Error Checking)
Prerequisites:
- Valid FITBIR account with GUID privilege
- Java Runtime Environment (JRE) installed on your computer (Version 7 or higher) http://docs.oracle.com/javase/7/docs/webnotes/install/index.html#windows
- CSV file properly formatted with PII
- Information needed to generate a GUID (birth certificates would be helpful, but are not required)
Populating the GUID Batch Template
FITBIR accepts an input file in comma separated format (CSV). The first line of the file should contain the PII field names as defined in Table 1. PII Fields. An additional “ID” field is required for the GUID output to map from the original participant to each generated GUID. The content of this field is left to the user’s discretion for output mapping, but could be a site’s local ID for the participant. If no such ID exists, then a simple ascending integer should be used for each participant. Below is an excerpt from an example GUID batch template.
The proper column headers are: id, First_Name, Middle_Name, Subject_Has_Middle_Name, Last_Name, MOB [1-12], DOB [1-31], YOB [####], City_Of_Birth, Country_of_Birth, Sex [M/F, at birth], GIID (optional), and GIIDCOUNTRY (optional).
Note: If you are collecting GIID and GIIDCOUNTRY information, you must add these headers to the GUID Batch Template worksheet.
For large creation of Batch GUIDs, the system processes total of 50 GUIDs per batch, and takes a pause of 30 seconds before processing the next batch of 50.
The GUID Batch Template can be downloaded from the FITBIR website
Procedure:
This procedure provides process steps for using the GUID Tool. The entire procedure typically takes 1-2 minutes (assuming Prerequisites are already met)
- Point your browser to the FITBIR website at http://fitbir.nih.gov
- Click the “LOG INTO FITBIR” button, and login with your username and password. LOG INTO FITBIR.
- There are two ways to find the GUID tool:
- Through Workspace→click on GUID icon -OR-
- Through the GUID tab in top navigation→GUID Tool→Create GUIDs
- Launch the GUID Tool
- Open or Save the Java™ Web Start Launcher
- Once it has downloaded, click on the file
- A window asking if you want to run the application will appear- click “Run”
- Click “Accept” when the EULA Agreement window opensFrom the Functions dropdown menu, select Create Multiple GUIDs
- Navigate to the location on the hard drive where CSV file containing multiple subjects’ PII information. Select the correspondingfile.
- Once the file is selected, Click Generate GUIDs.
- If successful, the generated GUIDs will appear in the table of the pop up window. Errors will also be shown in the lower half of the pop up window.
- Output log files are generated and deposited in the folder where the CSV file for upload is located. The output_guid_####.txt log file contains all the generated GUID numbers. The output_error_###.txt log file contains all the errors associated with the CSV file used for the Create Multiple GUID submission.
- You can now:
- Click Clear/New if you have additional conversions
- Exit the GUID Tool.
5. Generate Pseudo GUID
A Pseudo-GUID is a unique ID that should only be used if a researcher is unable to generate a valid GUID due to insufficient PII for a participant. However, submitting data with pseudo- GUIDs silos the associated research data from the other data associated with valid GUIDs. Pseudo GUID naming convention begins with “TBI_INV,” unlike GUID naming convention, which begins with “TBI...”
Prerequisites:
- Valid FITBIR account with GUID privilege
- Java Runtime Environment (JRE) installed on your computer (Version 7 or higher) http://docs.oracle.com/javase/7/docs/webnotes/install/index.html#windows
Procedure:
This procedure provides process steps for using the GUID Tool. The entire procedure typically takes 1-2 minutes (assuming Prerequisites are already met)
- Point your browser to the FITBIR website at http://fitbir.nih.gov.
- Click the “LOG INTO FITBIR” button, and login with your username and password.
- There are two ways to find the GUID tool:
- Through Workspace→click on GUID icon
- Through the GUID tab in top navigation→GUID Tool→Create GUIDs
- Launch the GUID Tool
- Open or Save the Java™ Web Start Launcher
- Once it has downloaded, click on the file
- A window asking if you want to run the application will appear- click “Run”
- Click “Accept” when the EULA Agreement window opens
- From the Functions dropdown menu, select Generate Pseudo GUID
- A pop up window will alert you prior to using this function, “You are about to generate a unique identifier in the system that is assigned to your account. This Pseudo GUID cannot be generated again. Are you sure you would like to generate a Pseudo GUID?"
- Select YES
- A Pseudo GUID will be generated and displayed on the screen.
- Click OK.
- You can now:
- Copy Pseudo GUID to clipboard.
- Copy Pseudo GUID and PII
- Clear any existing information and create a New Pseudo GUID
- Exit the GUID Tool
- Note: Only one GUID will be stored in the clipboard at a time. You must paste the GUID somewhere prior to generating the next GUID or else it will be overwritten.
6. Generate Multiple Pseudo GUIDs
A Pseudo-GUID is a unique ID that should only be used if a researcher is unable to generate a valid GUID due to insufficient PII for a participant. However, submitting data with pseudo- GUIDs silos the associated research data from the other data associated with valid GUIDs. Pseudo GUID naming convention begins with “TBI_INV,” unlike GUID naming convention, which begins with “TBI...”
Prerequisites:
- Valid FITBIR account with GUID privilege
- Java Runtime Environment (JRE) installed on your computer (Version 7 or higher) http://docs.oracle.com/javase/7/docs/webnotes/install/index.html#windows
Procedure:
This procedure provides process steps for using the GUID Tool. The entire procedure typically takes 1-2 minutes (assuming Prerequisites are already met)
- Point your browser to the FITBIR website at http://fitbir.nih.gov.
- Click the “LOG INTO FITBIR” button, and login with your username and password.
- There are two ways to find the GUID tool:
- Through Workspace→click on GUID icon
- Through the GUID tab in top navigation→GUID Tool→Create GUIDs
- Launch the GUID Tool
- Open or Save the Java™ Web Start Launcher
- Once it has downloaded, click on the file
- A window asking if you want to run the application will appear- click “Run”
- Click “Accept” when the EULA Agreement window opens
- From the Functions dropdown menu, select Generate multiple Pseudo GUIDs
- A window asking you to input the number of Pseudo GUIDS you would like to generate will pop up
- A pop up window will alert you prior to using this function, “You are about to generate a unique identifier in the system that is assigned to your account. This Pseudo GUID cannot be generated again. Are you sure you would like to generate a Pseudo GUID?"
- Select Generate
- Select the CSV file you have completed with any PII information
- Note: You do not need to add required fields when uploading the file for multiple Pseudo GUIDS.
- Your Pseudo GUIDs will be generated.
- Click OK.
- You can now:
- Clear any existing information and create a New Pseudo GUID
- Exit the GUID Tool
7. Search if GUID (or Pseudo GUID) exists in FITBIR
Prerequisites:
- Valid FITBIR account with GUID privilege
- Java Runtime Environment (JRE) installed on your computer (Version 6 or higher) http://docs.oracle.com/javase/7/docs/webnotes/install/index.html#windows
- GUID and Pseudo GUID ID numbers
Procedure:
This procedure provides process steps for using the GUID Tool. The entire procedure typically takes 1-2 minutes (assuming Prerequisites are already met)
- Point your browser to the FITBIR website at http://fitbir.nih.gov
- Click the “LOG INTO FITBIR button and login using your username and password.
- There are two ways to find the GUID tool:
- Through Workspace→click on GUID icon
- Through the GUID tab in top navigation→GUID Tool→Create GUIDs
- Launch the GUID Tool
- Open or Save the Java™ Web Start Launcher
- Once it has downloaded, click on the file
- A window asking if you want to run the application will appear- click “Run”
- Click “Accept” when the EULA Agreement window opens
- From the Functions dropdown menu, select Search if GUID(or Pseudo GUID) exists in FITBIR
- Enter GUID or Pseudo GUID ID and then click the Check button.
- The answer will appear in Result box.
- The GUID already exists.
- The GUID does not exist.
- Pseudo GUID has already been converted by valid GUID by <organization>.
- 8. Click Close
ACCESSING DATA
SOP-11 DOWNLOAD TOOL
SOP-11 DOWNLOAD TOOL
Reviewed: January 22, 2016
FITBIR Users may select datasets to download by placing them in their Download Queue. Then, using The Download Tool, users may download selected datasets from FITBIR to their own systems. The tool, which runs locally as a Java Web Start application on a user's computer, requires the Java runtime environment to be installed.
Prerequisites:
- Valid FITBIR account with Data Repository access (See SOP-01 & SOP-02).
- Java Runtime Environment (JRE) installed on your computer (Version 7 or higher) http://docs.oracle.com/javase/7/docs/webnotes/install/index.html#windows
Successful Upload of Data (using Upload Tool) to a study.
Procedure:
This procedure provides process steps for populating the Download Queue and using the Download Data Tool.
Note: Time will vary depending on the size of package being downloaded from FITBIR
Populating Download Queue
- Point your browser to the FITBIR website at http://fitbir.nih.gov
- Click the “LOG INTO FITBIR” button, and login using your username and password.
- Navigate to Manage Studies:
- Through Workspace→Data Repository→Manage Studies -OR-
- Through Data Repository tab in top blue navigation→Manage Studies
- Click on View Studies
- Select the Study from which you wish to download a dataset by clicking on the Study Title.
- Note: You can search for studies in the search bar.
- Click on the + next to Data Set Submissions to see all submitted data sets.
- Select the dataset you wish to download by clicking on its name.
- A pop-up window will open with information regarding the dataset.
- Click “Add to Download Queue.”
- The datasets will now appear in your Download Queue on the Manage Studies page.
Download Tool
- Point your browser to the FITBIR website at http://fitbir.nih.gov.
- Click the “LOG INTO FITBIR” button, and login using your username and password.
- The Download Data Tool is located:
- Through Workspace→Data Repository→Download Data Tool -OR-
- Through Data Repository tab in top blue navigation→Download Data Tool
- Launch Download Data Tool. You can also launch the download tool immediately after downloading data to your queue.
- Open or Save the Java™ Web Starter Launch
- Run the application
- Click “Accept” when the EULA Agreement window pops up
- Select Download Location
- Click the Browse Button
- Navigate to location on your computer of the working directory where you want the file to be downloaded. Select the folder, and then click Open.
- The files you have added to your download queue will appear in the Download Packages section.
- Select the files you want to download by clicking the check box next to the file name.
- Click Start Download.
- The screen will update as file(s) are being downloaded. If Download is successful, the Status will be designated as Completed and you will have immediate access to your downloaded files.
- A window asking if you would like to clear your completed downloads will appear. If you click “No,” these downloads will appear the next time you open the Download Tool.
SOP-12 FITBIR UPLOAD TOOL
SOP-12 FITBIR UPLOAD TOOL
Reviewed: January 22, 2016
After successful creation of a Submission Package using the Validation tool, data can now be submitted to the FITBIR informatics system. The Upload tool facilitates this process. The tool, which runs as a Java Web Start application, runs locally on a user's computer, requiring the latest Java runtime environment to be installed.
Procedure:
This procedure provides process steps for using the upload Data Tool.
Note: Time will vary depending on the size of package being uploaded to FITBIR
Upload Data Tool
Prerequisites:
- Valid FITBIR account (See SOP-01 & SOP-02).
- Java Runtime Environment (JRE) installed on your computer (Version 7 or higher) http://docs.oracle.com/javase/7/docs/webnotes/install/index.html#windows
Successful creation of a submission file and zip (using Validation Tool)
- Point your browser to the FITBIR website at http://fitbir.nih.gov
- Click the Log Into FITBIR button and login using your username and password.
- The Upload Data Tool is located:
- Through Workspace→Data Repository→Submission Tools -OR-
- Through Data Repository tab in top blue navigation→Submission Tools
- Click “Launch Submission Tools”
- Open or Save the Java™ Web Starter Launch
- Run the application
- Accept the EULA Agreement in the pop up window
- To upload data:
- Step 1. Ensure that your data has been validated. If not, validate your data first in the Validation Tool Tab. You can then click “Build Submission Package,” and you will automatically be transferred to the Upload Tool
- Step 2. Click Browse next to Submission Ticket (XML)
- Note: Navigate to location on your computer of the working directory where the file for submission is located. Select the file, and then click Open.
- Step 3. Enter a Dataset Name
- Note: The name must be unique to the selected Study.
- Select the Start Submission Upload button.
- Click, OK to confirm your submission.
- Note: Screen will update as file(s) are being uploaded to FITBIR. If Upload is successful, the Status will be designated as Completed.